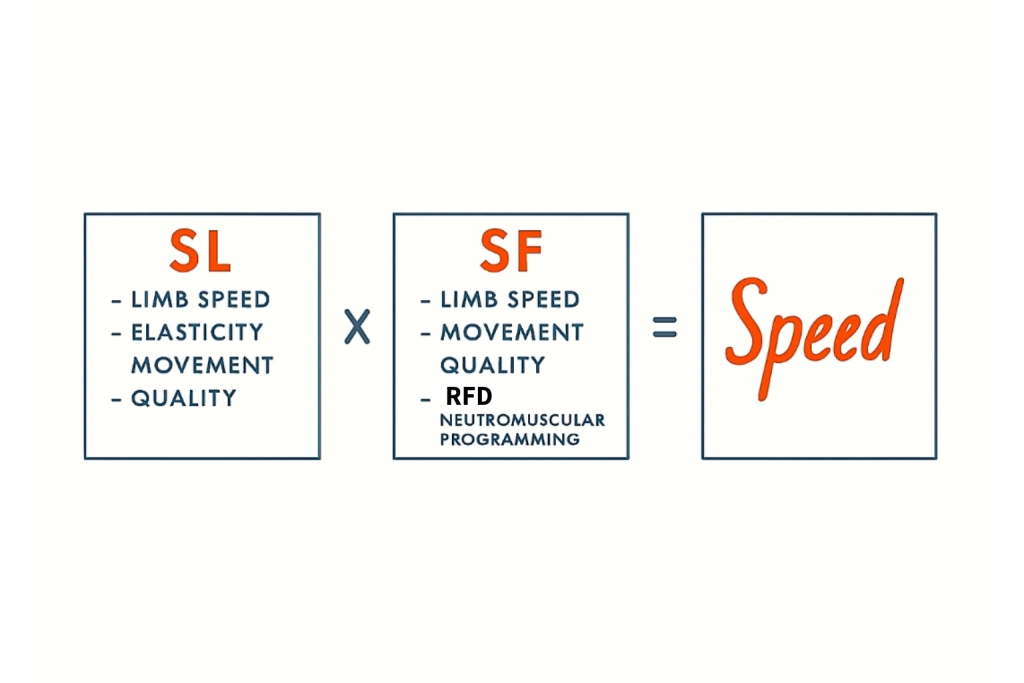
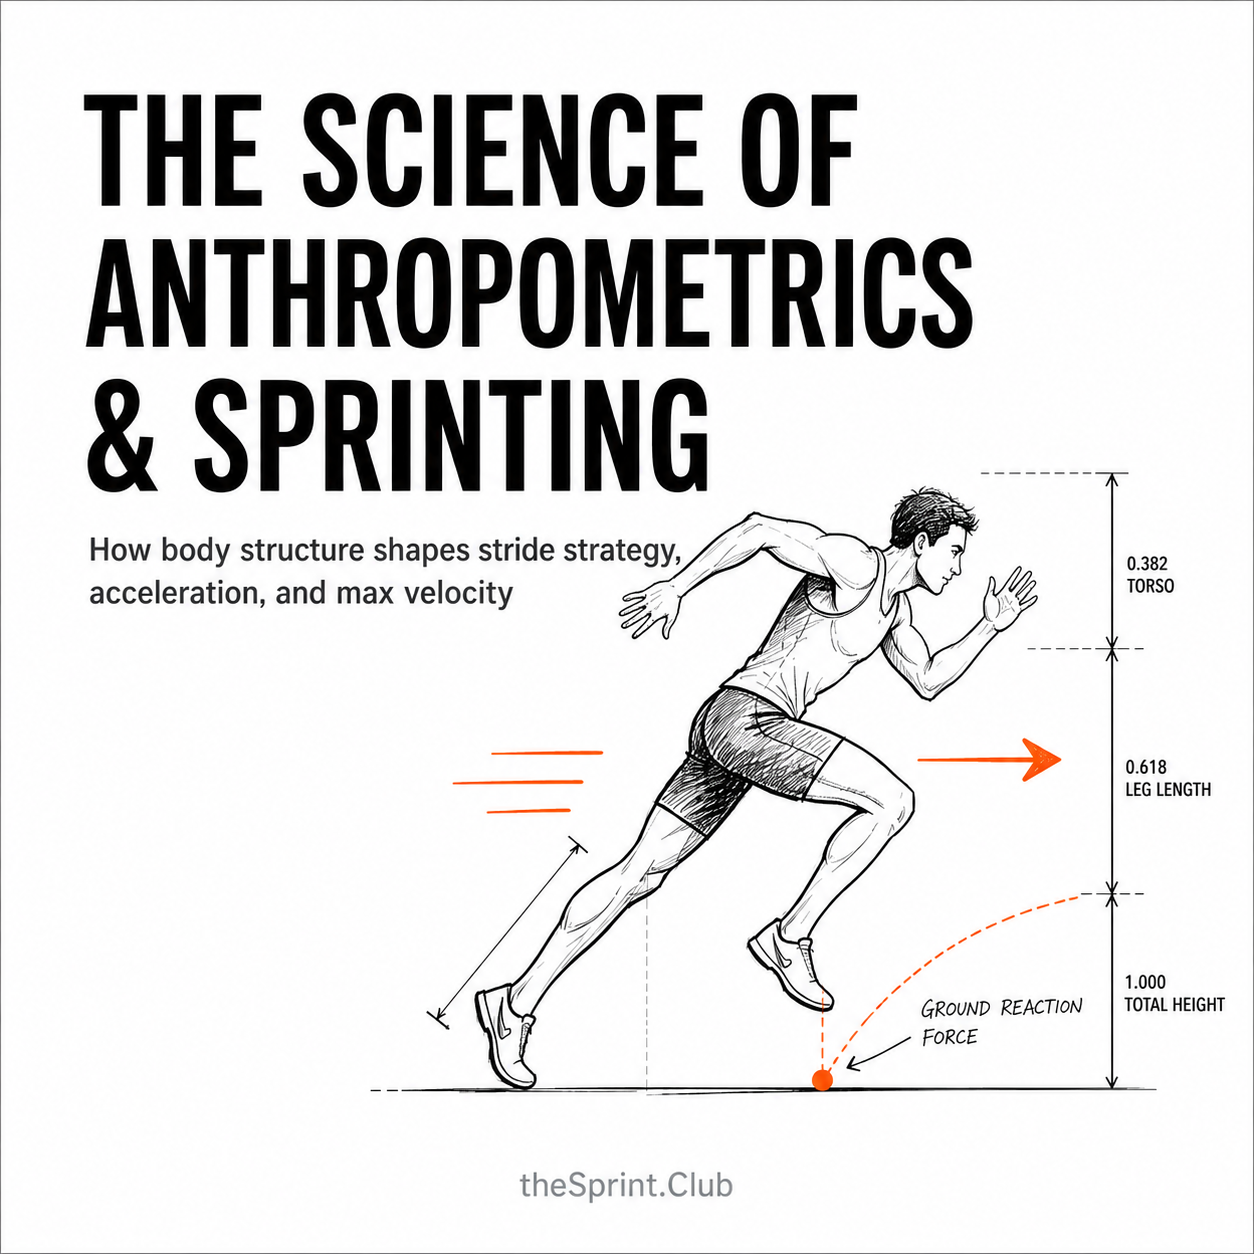
loader image

Sprinting Simplified

The Beginner’s Guide to What Sprinting Really Is

Title slide with large headline SPRINTING SIMPLIFIED, subtitle The Beginner's Guide to What Sprinting Really Is, theSprint.Club at the bottom left, and a simple orange line drawing of a running figure on the right.

Contents

Sprinting speed is mastering where you put force in milliseconds

Table titled 'Sprinting vs. Jogging at a Glance' listing aspects—simple definition, primary goal, muscle demand, ground contact, force orientation, key mechanics, and analogy—and contrasting jogging as a comfortable sub‑max pace aimed at sustaining movement with moderate cyclical effort, longer softer contacts, mostly vertical support, easy posture/relaxed turnover and the analogy 'second gear cruising,' versus sprinting as at/near maximum velocity to cover ground fast with explosive force and rapid coordination, very short high‑force contacts, horizontal acceleration (vertical at max speed), precise posture/arm timing/“whip from the hip” and stiff ankle on strike, analogy 'flooring the gas pedal'

What Is Sprinting? (Definition for Beginners)

Most people think they’ve sprinted. But here’s the truth: jogging faster or “picking up the pace” isn’t the same thing. Sprinting is running at or near your maximum velocity, using explosive muscular force and precise mechanics to cover ground as quickly as possible.

In biomechanics terms, sprinting is about producing high ground reaction forces in very short contact times, while coordinating your arms, hips, and legs to maximize forward propulsion.

👉 Think of it this way:

  • Jogging is like cruising in second gear.
  • Sprinting is flooring the gas pedal — the engine (your muscles) redlines, and every millisecond counts.


Why Sprinting Matters (Health, Sport, and Everyday Life)

Sprinting isn’t just for Olympic sprinters. It’s one of the most fundamental athletic skills for humans:

  • Sports performance: Football, soccer, basketball, rugby — sprint speed often decides the game.
  • Health benefits: Sprinting improves cardiovascular health, burns fat, and develops fast-twitch muscle fibers that decline with age.
  • Functional fitness: Being able to accelerate quickly can mean catching a train, chasing your kid, or simply moving with more power.


And because sprinting recruits nearly every muscle group, it’s been called the “king of athletic movements.”


The Phases of a Sprint: From Acceleration to Top Speed

Sprinting isn’t one uniform effort — it unfolds in phases:

  1. Acceleration Phase (0–30m):
    • Goal: Build speed.
    • Mechanics: Powerful horizontal pushes into the ground, long shin angles, body leaning forward.
    • Research shows horizontal force orientation is key here.
  2. Transition Phase (30–50m):
    • Goal: Smoothly shift from driving forward to upright sprinting.
    • The angle of force gradually becomes more vertical.
  3. Max Velocity Phase (50–80m):
    • Goal: Hit and maintain top speed.
    • Mechanics: Very short ground contact times, stiff legs, and whip-like thigh motion.
  4. Deceleration Phase (>80m):
    • Goal: Resist slowing down.
    • Even elite sprinters can’t maintain peak velocity beyond ~7 seconds.


Infographic titled “Sprint Phases Timeline” showing four running silhouettes and captions: Start (blocks/first steps) with ~45° shin angle and explosive forward lean; Early Acceleration with 60°–50° shin angle, strong forward lean and driving stride; Late Acceleration/Transition with 60°–70° angle, longer steps and increasing frequency; and Maximum Velocity with upright vertical posture and minimal contact times, accompanied by a small force-orientation graph across the phases.

“Sprinting isn’t one skill set—it’s four phases: push to build, rise to upright, bounce at max velocity, then fluid movement to keep the momentum.”

Sprinting Mechanics Explained

Ground Reaction Forces (GRF)

Every sprint step is a collision with the ground. You strike your foot down, and the ground pushes back — that’s the ground reaction force.

  • At the start: the key is horizontal GRF (pushing backward to go forward).
  • At top speed: the key shifts to vertical GRF — applying massive force in a blink to bounce into the next stride.


Elite sprinters don’t just strike with more force — they push better, orienting their force efficiently.

Three-box diagram: left box labeled SL lists limb speed, elasticity movement, and quality; middle box labeled SF lists limb speed, movement quality, and RFD neuromuscular programming; an equals sign after them leads to a right box with the word Speed in large orange script.

Stride Length vs. Stride Rate

Speed = stride length × stride rate.

  • Faster sprinters achieve longer strides and quicker turnover.
  • Research shows they also have shorter contact times and higher stiffness.

👉 Analogy: It’s like cycling — you can go faster by pedaling quicker, by using bigger gears, or by mastering both.

Leg Stiffness and Elastic Energy

Think of your legs as pogo sticks.

  • Leg stiffness = how well your tendons and muscles store/release elastic energy.
  • Faster sprinters show higher vertical and leg stiffness, which shortens ground contact and boosts stride efficiency.


Too little stiffness = “sinking” into the ground.

Too much stiffness = injury risk. Balance is key.

Scatter plot titled 'Sprint speed rises with thigh angular velocity' showing a positive correlation between sprint speed (km/h) on the x-axis and thigh angular velocity (g/s) on the y-axis, with orange points labeled Novice clustered at lower speeds, blue points labeled Elite at higher speeds, a dashed trend line annotated R² ≈ 0.70 and notes about hip-driven speed increases.

Angular Velocity: The “Whip from the Hip”

A breakthrough concept in sprinting: thigh angular velocity.

  • The faster your thigh swings, the more vertical force you generate at touchdown.
  • Studies show thigh angular speed strongly correlates with running speed.

👉 Imagine cracking a whip: the faster the handle (hip) moves, the more power travels down the line (your leg).

Infographic titled '5 Keys to Sprinting Fast' with numbered tips and simple icons: 1) Ground Reaction Forces — foot pushing the ground and a small bar chart, 2) Stride Mechanics — diagram balancing stride length and rate with beginner vs elite lines and a running silhouette, 3) Angular Velocity — 'whip from the hip' thigh swing illustrated with a spring, and 4) Leg Stiffness & Elastic Energy — reduced ground contact foot, spring graphic and a circular diagram linking posture, rhythm, foot strike and arms.

Key Attributes That Make Someone Fast

Strength & Power

Explosive strength lets you generate force quickly. Resistance training — especially targeted loads like wearable resistance — can improve sprint acceleration.

Coordination & Timing

It’s not brute force alone. Elite sprinters time every limb swing, foot strike, and arm drive with near-perfect precision.

Horizontal vs. Vertical Force Application

Science consistently shows it’s not just how much force you create, but where you direct it. Horizontal force dominates acceleration; vertical force sustains top speed.

Muscle Activity and Biomechanics

Hamstrings, glutes, quads, and calves all contribute — but at different phases. For example, hamstrings are heavily loaded near top speed, explaining why they’re injury-prone.

Speed isn’t a gift—it’s a skill

Apply force in the right direction, whip the hip fast, and bounce off the ground

Infographic titled 'Why People Get Injured Sprinting' showing four panels: 'Never Truly Sprinting Before' (icons and a bar chart comparing jogging and sprinting forces), 'Weak or Unprepared Hamstrings' (muscle diagram and rising velocity curve), 'Poor Mechanics' (illustration of overstriding and collapsed posture), and 'No Progression' (step graphic and arrow warning against sudden zero‑to‑max effort), each accompanied by brief bullet-point explanations.

Why People Get Injured Sprinting

Many beginners “test their speed” without proper preparation.

Common pitfalls:

  • Never truly sprinting before: Jogging fast isn’t sprinting — the forces are dramatically higher.
  • Weak or unprepared hamstrings: These muscles absorb huge loads at max velocity.
  • Poor mechanics: Overstriding or collapsing posture overloads joints.
  • No progression: Going from zero to max effort without buildup spikes injury risk.


👉 Hamstring strains are the #1 sprinting injury because the hamstrings act as brakes and engines simultaneously.

How to Sprint Effectively as a Beginner

  • Never truly sprinting before: Jogging fast isn’t sprinting — the forces are dramatically higher.
  • Weak or unprepared hamstrings: These muscles absorb huge loads at max velocity.
  • Poor mechanics: Overstriding or collapsing posture overloads joints.
  • No progression: Going from zero to max effort without buildup spikes injury risk.


👉 Hamstring strains are the #1 sprinting injury because the hamstrings act as brakes and engines simultaneously.

Infographic titled "How to Sprint Effectively as a Beginner" summarizing sprint tips—learn the positions, make ground contacts powerful and stiff, and slowly progress volume and intensity—illustrated with running, shoe, arrow and progress icons and a small "Efficient Sprinting" pie chart.

How to Sprint Effectively as a Beginner

Sprinting is a high‑force, high‑speed skill. It rewards precision and progression more than “trying harder.” Start by learning the shapes and rhythms that let you apply big force in very short ground contacts, then build exposure gradually so tissues adapt and you stay healthy.


Bottom line: master the positions, make contacts powerful and stiff contacts on the ground, and progress volume and intensity slowly. Quality first. Quantity later. Speed follows.


  • Posture
  • Arm Action
  • Foot Strike
  •  Rhythm

Infographic titled “How to sprint effectively as a beginner” with three columns: “Master the positions” showing a running figure and advice on upright posture, forward lean and active arm drive; “Powerful & stiff contacts” with a shoe icon and a force-output graph recommending short, stiff ground contacts; and “Progress gradually” with a rising bar chart advising to increase sprint sessions slowly to build volume and intensity.

Posture organizes force

Infographic titled The Sprint Posture System showing three phases—Early Acceleration (0–30 m), Transition (30–50 m), and Max Velocity (50 m+)—with simple runner illustrations, diagrams, and bullet tips about leaning from the ankles and matching shin-torso angles, rising gradually with ribs stacked and pelvis level, and chest alignment with cues like “push back,” “grow tall,” and “whip from the hip.”

Posture

Lean slightly forward when accelerating; upright at max speed (torso still has a slight forward lean with chest just over the proximal thigh on thigh block).


Optimal posture in sprinting

Think “tall, aligned, and elastic.” Posture organizes force so you can push in acceleration and bounce at max velocity.

Universal posture keys

  • Head and neck: Eyes neutral (head & eyes down in acceleration), chin neutral. Lengthen through the crown, not “head back.”
  • Ribcage over pelvis: Stack ribs over hips. Avoid flared ribs or tucked pelvis.
  • Shoulders: Down and wide, not shrugged. Scapulae glide as arms swing.
  • Torso stiffness: Braced, not rigid. Hold tension like a spring, not like a plank.
  • Hips: Neutral to slight anterior tilt naturally; don’t force it. Let the thigh cycle freely.
  • Foot strike: Under (or just behind the center of mass in acceleration / just in front of COM in MaxV). No reaching.

By phase

  • Early acceleration (0–30 m)
    • Whole-body lean from the ankles, not the waist.
    • Shin angles match torso angle. Long, pushing contacts.
    • Cue: “Fall and push.” “Push back, back ,back.”
  • Transition (30–50 m)
    • Gradual rise to upright as contact times shorten.
    • Keep ribs stacked and pelvis level while amplitude of shapes reduces.
    • Cue: “Grow tall and build up pressure.”
  • Max velocity (50 m+)
    • Upright with a slight forward inclination.
    • Chest just over the proximal thigh at thigh block.
    • Quick bounce off the ground.
    • Cue: “Whip from the hip.” “Bounce off the ground.”


Common faults and fixes

  • Broken at the waist: Fix with ankle-lean drills and wall marches.
  • Shrugged shoulders and tense neck: Exhale gently and “zip the ribs.” Soft hands.
  • Overstriding and heel striking: Cue “step down under hips” and “elbow back” to time foot placement.
  • Pelvic tuck or over-arch: Stack ribs over pelvis.

Simple posture cues


  • “Ankles lean, body stays straight.”
  • “Chest over thigh.”
  • “Push back, back, back”
  • “Step down under you.”

Drills to build posture

  • Low intensity to High intensity bounds with chest over thigh block.
  • Wall march and wall switches: Teach ankle lean and stacked ribs-hips.
  • Sled pushes: Reinforces whole-body lean and horizontal push.
  • A-march to A-skip: Rhythm and tall hips.
  • Flying runs: Practice upright, elastic posture at speed.

Infographic titled “Arm action shapes define sprint rhythm” illustrating three sprint phases—Early Acceleration (0–30 m) with a forward‑leaning sprinter and long backswing cueed “punch the elbow back”; Transition to Upright (30–50 m) showing reduced arm amplitude while maintaining rhythm; and Max Velocity (50 m+) showing compact, snappy arm cycles with elbows ~80–100°, accompanied by simple runner drawings and small velocity graphs.

Arm Action

Arm Action: Bigger Shapes on Early Acceleration… working to smaller more compact shapes on MaxV.

  • Hinge, don’t reach: Movement happens mainly at the shoulder joint with a supple elbow hinge. Hands stay relaxed.
  • Symmetry: Right arm pairs with left leg and vice versa. Arm timing matches leg timing.
  • Back swing > forward reach: Emphasize driving the elbow back past the torso rather than “reaching” forward. The hand crosses roughly to the sternum line in front. Avoid crossing midline excessively.
  • Hand path: Close to the body, pocket-to-chin pathway. Think “hip pocket to cheek.”

Acceleration vs. max velocity

    • Early acceleration (0–30 m):
      • Bigger shapes. Longer back swing with the elbow traveling behind the ribcage.
      • Hands travel from roughly the back pocket area up to cheek level.
      • Cue: “Punch the elbow back.” The forward hand stays compact so you don’t overreach and brake.
    • Transition to upright (30–50 m):
      • Gradually reduce amplitude as posture rises.
      • Keep rhythm constant while ranges shrink slightly.
    • Max velocity (50 m+):
      • Compact, snappy cycles. Elbow stays around ~90–100°.
      • Very fast backswing with relaxed hands and quiet shoulders.
      • Cue: “Quick back, quiet front.” Let the elbow snap rearward; the front recovers itself.

Speed comes from the back swing

  • The powerful action is extending the shoulder to pull the elbow behind the body, which helps coordinate a strong, vertical force application under the hips.
  • Avoid “throwing” the hands forward. Overreaching in front often triggers overstriding and braking.

Relaxation and rhythm

  • Face, jaw, and hands relaxed. Think “carry a potato chip” rather than a fist.
  • Shoulders glide, not shrug. If traps are firing, you’ll slow the arm swing and waste energy.
  • Maintain a rhythm that matches leg frequency. Arms set cadence; legs express force.

Common errors to avoid

  • Overcrossing midline: Rotates the torso and leaks force. Keep elbows tracking mostly sagittal.
  • Straightening the elbow: Long levers are slow levers; keep the hinge.
  • Shoulder hiking: Elevates COM, disrupts timing, invites tension.
  • Overreaching forward: Leads to heel strike and braking.
  • “Hammer hands”: Tension in the hands spreads up the chain.

Simple cues

  • “Elbow back, pocket to cheek.”
  • “Quick back, quiet front.”
  • “Big early, compact late.”
  • “Soft hands, low shoulders.”
  • “Whip from the shoulder, hinge at the elbow.”

Infographic titled 'The Foot Strike System' showing three phases—Early Acceleration, Transition, and Max Velocity—with stick-figure running illustrations, bullet-point cues about landing relative to the center of mass (push the ground back, whip from the hip, strike down under you), and small charts for contact time and vertical force.

Foot Strike

Foot Strike:

Land under hips, not ahead.

Optimal foot strike in sprinting

Think “strike down under you, get off fast.” Foot strike should place force under or just behind the center of mass with very short contact.

You want to “Whip from the Hip” to create lower limb velocity to that makes a violent collision with the ground and then “BOUNCE off the ground” at MaxV to minimize ground contact time (GCT)

Key principles

  • Where: Land under the hips, not out in front. Slightly behind COM in early acceleration, directly under at max velocity.
  • How: “Whip down” from above. The foot travels backward at touchdown, matching ground speed to minimize braking.
  • What part of foot: Forefoot/mid-forefoot contact with a quick, elastic roll. The heel may kiss the ground briefly in acceleration. At max velocity many sprinters stay forefoot with minimal heel contact.
  • Stiffness: High ankle stiffness at contact. Think “rigid lever, elastic rebound.”
  • Time: Very short contact times. Faster is better, provided you still apply big force.

By phase – Working from Pushing BACK to Bouncing off the ground

    • Early acceleration
      • Slightly longer contact and more backward push.
      • Foot lands just behind COM with a forefoot-first feel and quick heel kiss acceptable.
      • Cue: “Push the ground back.”
    • Max velocity
      • Very vertical forces. Foot strikes directly under COM with a rapid “whip from the hip and bounce off a stiff foot” action.
      • Pure forefoot contact common, with ultra-brief ground time.

Technical hallmarks

  • Shank at touchdown is NEAR (but not completely) vertical at max velocity, more acute in acceleration.
  • The ankle is pre-tensioned. No floppy ankle, no loud slaps.
  • The thigh cycles down and the foot meets the ground moving backward


Common errors and fixes

  • Overstriding/heel striking in front
    • Effect: Braking, longer ground time, hamstring stress.
    • Fix: Cue “step down under hips.” Pair with “elbow back” to time placement.
  • Reaching with toes
    • Effect: Toe-first poke creates tension and late force.
    • Fix: Cue “foot travels down, not forward.” Keep the ankle stacked.
  • Soft ankle on contact
    • Effect: Energy leak and collapse.
    • Fix: “Stiff on strike.” Isometrics and calf-ankle stiffness drills.
  • Crossing midline
    • Effect: Wasted lateral motion and pelvic rotation.


Simple cues

  • “Whip from the Hip”
  • “Bounce off the Ground”
  • “Push back, back, back” (acceleration)
  • “Quiet, quick contacts.”
  • “Stiff ankle, soft shoulders.”

Drills that transfer

  • A-march to A-skip: Grooves vertical “step-down” under COM.
  • Heavy Sled Pushes: Teaches shank angle and pushing back with proper posture.
  • (Almost) Straight-leg bounds: Encourages quick contacts and ankle stiffness.
  • Flying 10s: Practice true max-V foot placement with full recovery.


Strength and prep

  • Ankle and calf isometrics. Heavy isos for Achilles-soleus stiffness.
  • Foot intrinsics work: Barefoot Drills, Barefoot Sprinting (or with Xero Shoes), SlantBoard Jumps, Eccentric Landings on Tripod of Foot
  • Hip extensor strength: Glute-ham machine, Split Squats (ideally on a flywheel machine), Slip Squat landings with safety squat bar


*Put simply: place the foot under you with a stiff, pre-tensioned ankle, strike down not forward, and leave the ground fast.

Sprinting Myths Busted

  • “It’s all genetics.”

    Genetics matter, but training force orientation, stiffness, and mechanics can make anyone faster.

  • “Lifting weights makes you slow.”

    Strength training, when applied correctly, boosts acceleration and sprint power.

  • “Only young athletes should sprint.”

    With proper progression, sprinting is one of the best anti-aging exercises.

Key Takeaways

  • Sprinting = max-velocity running requiring unique mechanics, not just “running faster.”
  • Speed comes from force orientation, leg stiffness, angular velocity, and coordination.
  • Beginners often get injured because they underestimate the demands of true sprinting.
  • Anyone can sprint better with smart, progressive training.

FAQs

What muscles are used in sprinting?

Sprinting uses nearly the entire body, but the main movers are the hamstrings, glutes, quadriceps, and calves. The hamstrings and glutes power hip extension, quads drive the knee, and calves handle explosive push-off. Arms and core play key roles in balance and coordination.

Is sprinting safe for beginners?

Yes, sprinting can be safe if introduced gradually. Beginners should focus on drills, technique, and progressive intensity before going all-out. Most injuries occur when people “max out” without preparation, especially in the hamstrings.

How fast should a beginner sprint?

A beginner should sprint at about 70–80% of their maximum effort when starting out. Full-effort sprints should only be attempted after several weeks of building strength, coordination, and sprint drills.

What makes someone fast at sprinting?

Speed comes from a combination of force application, stride mechanics, and coordination. Elite sprinters apply force more effectively — directing it horizontally during acceleration and vertically at top speed. Leg stiffness, thigh angular velocity, and muscle power also play major roles.

How often should you sprint?

Most people benefit from sprinting 1–2 times per week, with full recovery between sessions. Sprinting is very demanding, so quality matters more than quantity.

Share the Post:

Related Posts

the sprint club thesprint.club logo

theSprint.Club

Join theSprint.Club

The Science, Art, & Love of Speed in your inbox.
Man standing against a pale gray background wearing a navy T-shirt printed with a large white silhouette of a running figure, hands in his pockets, head tilted and forearm tattoos visible.
thesprintclub logo

theSprint.Club

Join the squad.
Explore the gear.
Get faster.
white thesprint.club sprinter tee tshirt