loader image

Sprint Qualities

The Complete Guide to Building Blocks of Elite Speed

Black silhouette of a sprinter in mid-stride wearing sunglasses and a crown on an orange background, with 'SPRINT QUALITIES' on the torso and related terms (power, elasticity, RFD, stiffness, foot & ankle complex, speed endurance, special endurance) scattered around.

What Are Sprint Qualities? A Simple Definition…

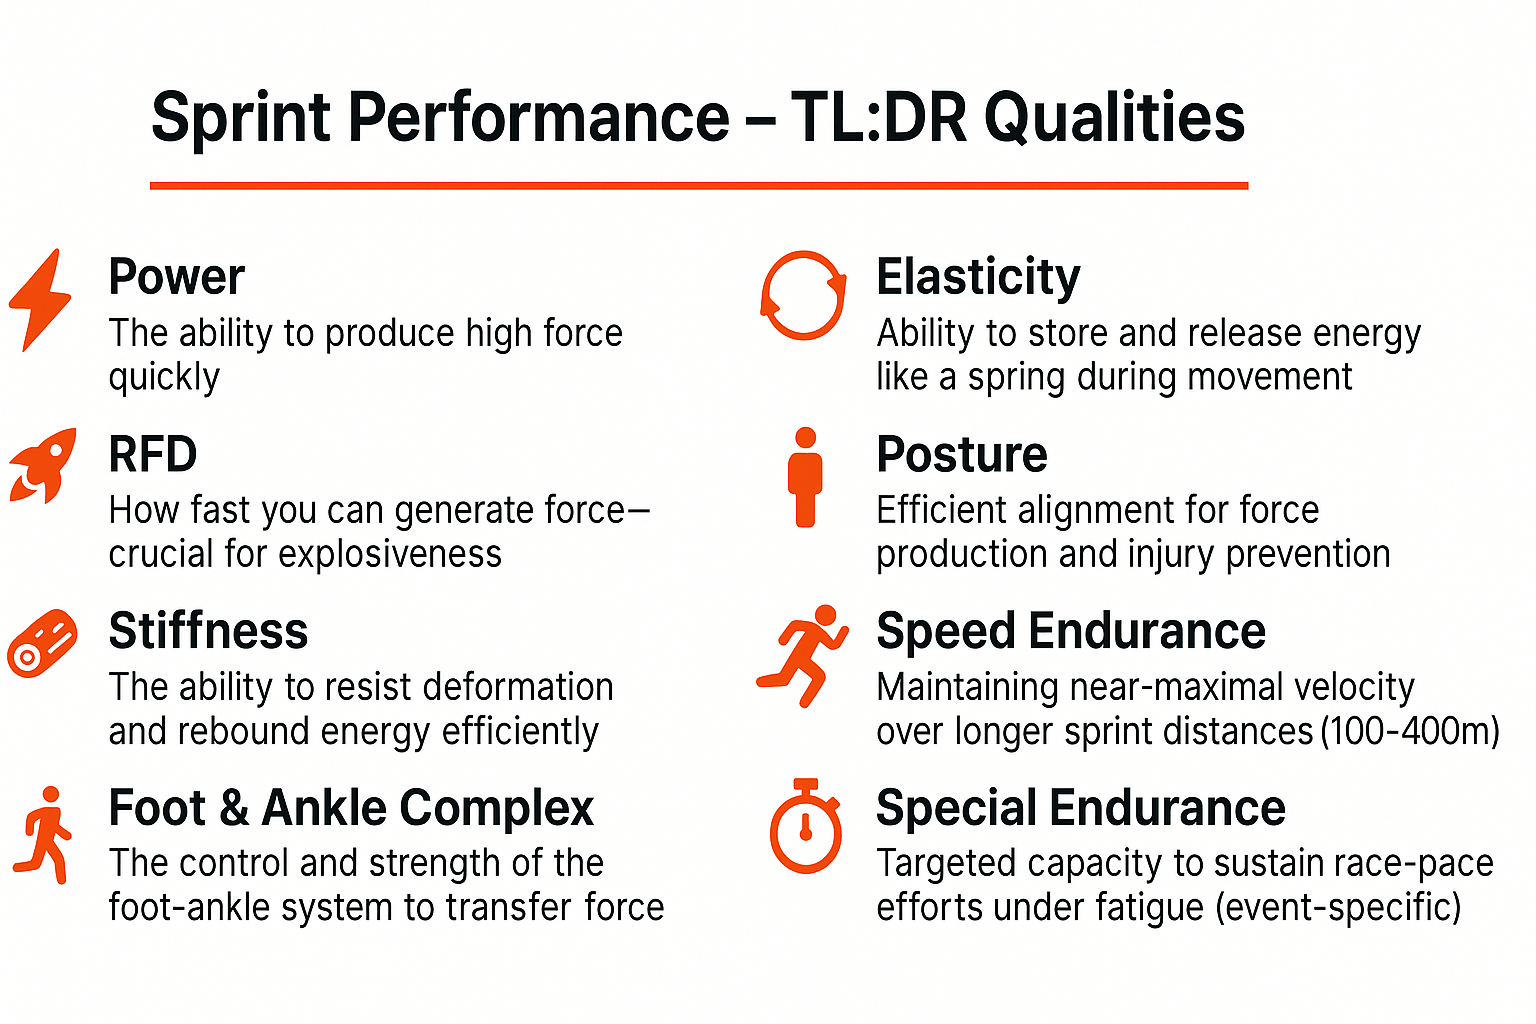
Sprint qualities are the specific physical and technical attributes that determine a sprinter’s ability to accelerate rapidly, achieve maximum velocity, and maintain speed efficiently. These trainable characteristics include power (force production in minimal time), rate of force development (RFD), stiffness (muscle-tendon resistance to deformation during ground contact), foot and ankle complex strength, elasticity (ability to store and release energy), proper posture and pelvic control, coordination and rhythm, and speed endurance. Elite sprinters develop these qualities through targeted training methods to optimize performance across all phases of sprinting.

7 Sprint Qualities

  1. Power
  2. RFD
  3. Stiffness
  4. Foot & ankle complex
  5. Elasticity
  6. Posture
  7. Speed Endurance
  • Special Endurance*

Contents

Stiffness + elasticity = BOUNCE!

BOUNCE Formula

What Are Sprint Qualities? A Simple Definition

Sprint qualities are the specific physical and technical attributes that determine a sprinter’s ability to accelerate rapidly, achieve maximum velocity, and maintain speed efficiently. These trainable characteristics include power (force production in minimal time), rate of force development (RFD), stiffness (muscle-tendon resistance to deformation during ground contact), foot and ankle complex strength, elasticity (ability to store and release energy), proper posture and pelvic control, coordination and rhythm, and speed endurance. Elite sprinters develop these qualities through targeted training methods to optimize performance across all phases of sprinting.

Why thinking in “qualities” beats chasing random drills

Thinking in “qualities” beats chasing random drills because it provides a comprehensive framework for developing speed that targets the underlying athletic attributes needed for sprinting success. Here’s why this approach is superior:

Foundation vs. Symptoms

Quality-based training addresses the root causes of speed rather than just copying what fast sprinters do. When you understand that speed requires specific physical qualities (power, stiffness, elasticity, etc.), you can systematically develop these attributes rather than randomly implementing drills that may not address your specific weaknesses.
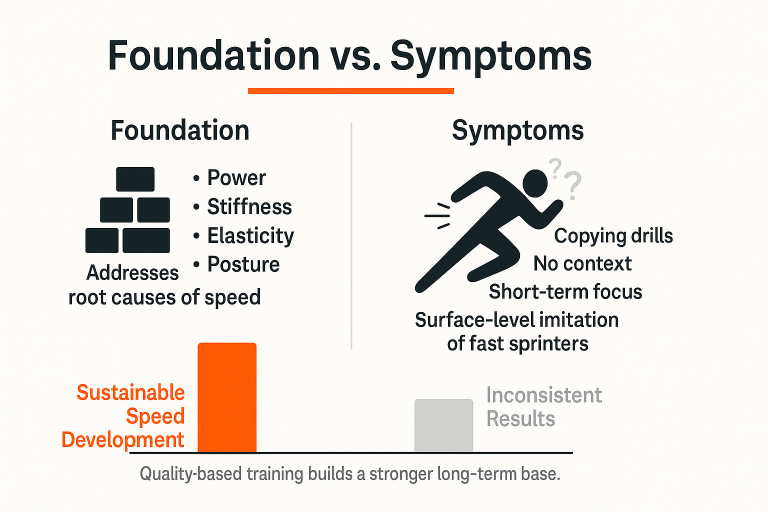
Infographic titled 'Foundation vs. Symptoms' comparing a left column with a brick icon labeled Foundation and bullets 'Power, Stiffness, Elasticity, Posture' plus 'Addresses root causes of speed' and a tall orange bar labeled 'Sustainable Speed Development', against a right column with a running-figure icon labeled Symptoms and bullets 'Copying drills, No context, Short-term focus, Surface-level limitation of fast sprinters' and a small gray bar labeled 'Inconsistent Results', with footer 'Quality-based training builds a stronger long-term base.'

Context and Purpose

Sprint drills serve two primary purposes:

  • Context: How a drill impacts subsequent speed work
  • Functional strength: How a drill develops muscles, fascia, and tendons

Many common drills offer limited transfer to actual sprinting because they lack horizontal ground speed and proper push mechanics. Elite sprinters who perform these drills already possess the underlying qualities that make the drills effective.

Transfer of Training (of Sprint Drills)

“The drills themselves don’t make you faster. Integrating the drills into your mechanics is what makes them faster.” Many athletes mistakenly believe that repetition of drills alone guarantees improvement, when what matters is how those drills translate to actual sprint mechanics.

Systematic Development

A qualities-based approach allows for systematic progression:

  • Smaller to bigger movements
  • Slower to faster execution
  • Shorter to longer distances

Individualized Training

Different athletes need to develop different qualities based on their unique strengths and weaknesses. By thinking in qualities, coaches can identify an athlete’s “weakest link” and address it specifically, rather than assuming all athletes need the same drills.

Integration Over Isolation

Speed is built on the integration of multiple qualities working together. For example, “stiffness + elasticity = bounce”, which is essential for elite speed. Understanding how these qualities interact helps create more effective training programs.

By focusing on developing fundamental qualities like power, stiffness, elasticity, and coordination rather than copying specific drills used by elite athletes, you create a more robust foundation for speed development that addresses your unique needs as an athlete.
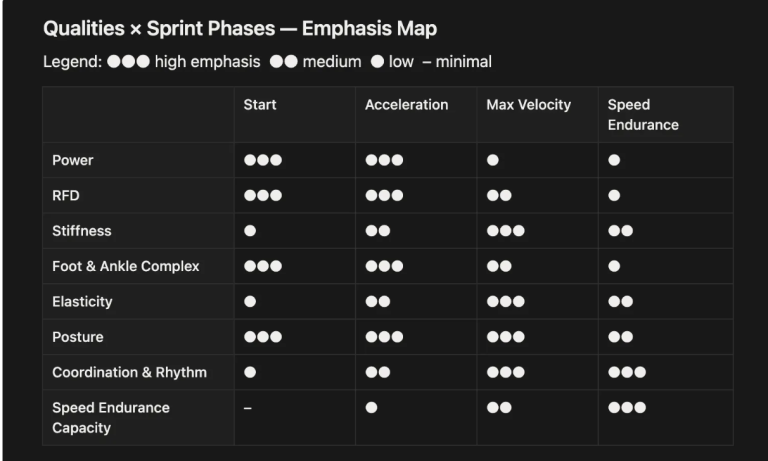
  • How qualities map to the sprint phases and to programming blocks
  • Small diagram: qualities layered across the sprint phases

Table titled “Qualities × Sprint Phases — Emphasis Map” showing emphasis (three dots = high, two = medium, one = low) for physical qualities across sprint phases: Start, Acceleration, Max Velocity, and Speed Endurance; rows list Power, RFD, Stiffness, Foot & Ankle Complex, Elasticity, Posture, Coordination & Rhythm, and Speed Endurance Capacity, with Power and RFD strongly emphasized in Start and Acceleration, Foot & Ankle Complex emphasized in Start and Acceleration, Stiffness and Elasticity emphasized in Max Velocity, Posture emphasized across phases, and Speed Endurance Capacity emphasized mainly in Max Velocity and Speed Endurance.

Notes

  • Start emphasizes projection and horizontal force. Power, RFD, and foot-ankle contribution are decisive.
  • Acceleration blends projection with rising rhythm. Posture, power, and RFD stay primary.
  • Max velocity prioritizes stiffness, elasticity, upright posture, and precise rhythm.
  • Speed endurance layers fatigue resistance onto max-velocity mechanics. Keep rhythm and posture while extending distance and density.

For each quality: definition, why it matters, how to train, common errors, tests and benchmarks, progressions.

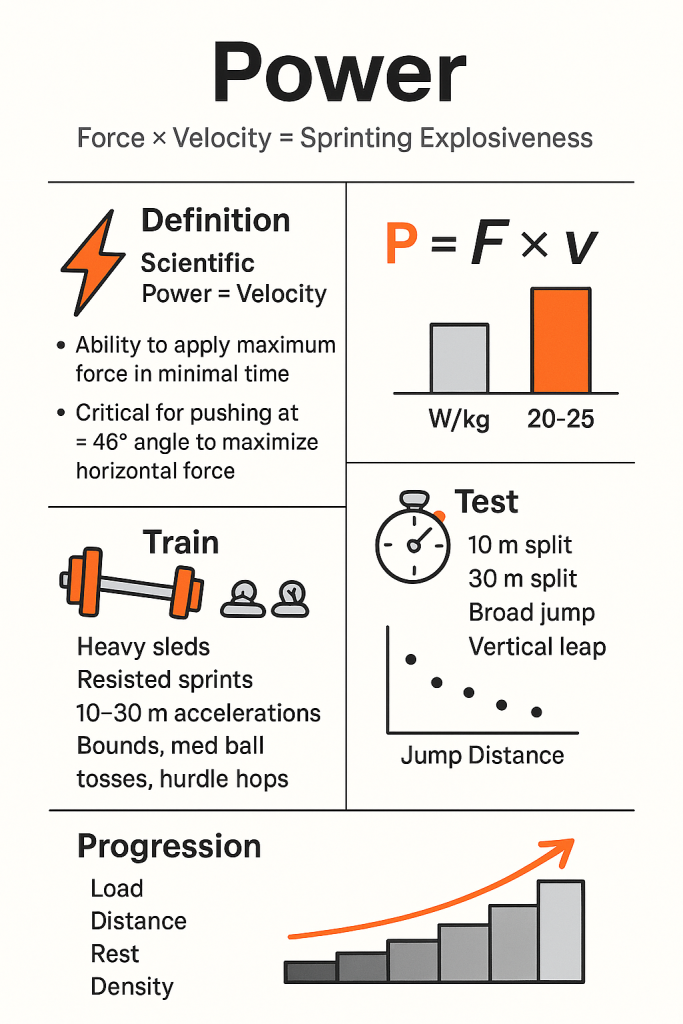
Infographic titled "Power" explaining Force × Velocity = Sprinting Explosiveness with a definition and lightning icon, formula P = F × v and a 20–25 W/kg bar chart, recommended training (heavy sleds, resisted sprints, 10–30 m accelerations, bounds, med-ball tosses, hurdle hops) with a dumbbell icon, testing measures (10 m and 30 m splits, broad jump, vertical leap) with stopwatch and jump-distance plot, and a progression graphic listing load, distance, rest, and density with an upward arrowed bar chart.

Power

Scientific Definition:

Power in athletics is scientifically defined as the product of force and velocity (P = F × v), or the ability to exert maximum force in the shortest time possible. Elite sprinters can generate approximately 20-25 watts per kilogram of body weight during peak velocity.

Sports Performance/Sprint-Related Definition:

In the context of sprinting, power is:

  • The ability to generate force in a limited time window – specifically during the collision time with the ground
  • A combination of limb speed and the ability to manage the collision that results from that speed of limb movement
  • The rate at which an athlete’s neuromuscular system recruits and activates muscular motor units, resulting in quicker, more powerful contractions

Power can be increased by either increasing the force or by decreasing the time over which that same amount of force is applied. This is also known as Rate of Force Development (RFD).

For sprinting specifically, there’s a minimum threshold of power an athlete needs to generate to effectively push out of a start position at the right angles (approximately 45°) and apply force into the ground in a horizontal orientation.
  • Train: heavy sleds, resisted sprints, 10–30 m accelerations, bounds, med ball tosses, hurdle hops
  • Test: 10 m and 30 m splits, broad jump, vertical leap
  • Progression: load, distance, rest, density

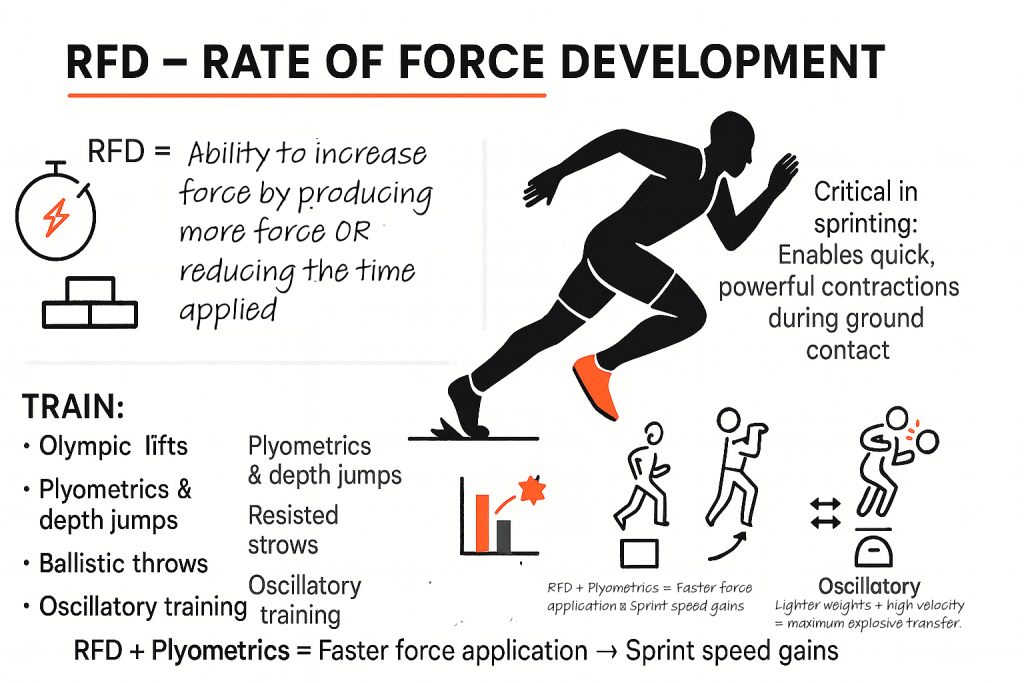
rate of force development is key to producing power in sprinting

RFD (Rate of Force Development)

Definition: RFD stands for Rate of Force Development. It’s described as the ability to increase force production by either increasing the total force or by decreasing the time over which that force is applied.

In sprinting, RFD is a critical component of power production and directly impacts an athlete’s ability to generate quick, powerful muscle contractions during ground contact phases.

  • Train: plyometrics, ballistic exercises, resisted sprints, Olympic lifts, and depth jumps that emphasize explosive movements with minimal ground contact time. French Contrast method (heavy strength exercise followed by plyometrics) has been shown to improve sprint performance.
  • Focus on exercises that develop rapid force application within the limited ground contact window of sprinting.

Ballistic Exercises

Ballistic exercises are explosive movements where the athlete applies maximum force to accelerate an object (like a medicine ball or barbell) and then releases it or allows it to become airborne. These exercises are characterized by:

  • High velocity movements performed as fast as possible
  • Explosive power development using lighter weights (typically 20-55% of 1RM)
  • Movement patterns that involve rapidly accelerating and then releasing or projecting force

Examples of ballistic exercises include:

  • Jump-throw combinations (like depth jump to vertical med ball toss)
  • Olympic lift variations performed explosively
  • Oscillatory exercises where athletes rapidly change direction over a small range of motion

Ballistic training is most effective when programmed strategically within a training plan, particularly during power and speed acquisition phases. It works well when combined with plyometric training to enhance explosive power development for sprinters.
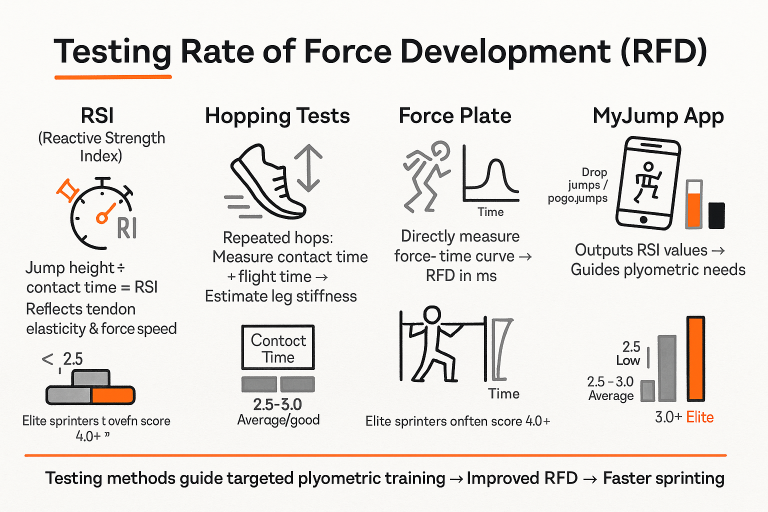
Infographic titled “Testing Rate of Force Development (RFD)” showing four methods: RSI (Reactive Strength Index = jump height ÷ contact time, reflects tendon elasticity and force speed, typical scores <2.5 low and elite 4.0+), Hopping Tests (repeated hops measure contact time and flight time to estimate leg stiffness, contact time 2.5–3.0 = average/good), Force Plate (directly measures the force–time curve to calculate RFD in milliseconds), and MyJump App (smartphone app that outputs RSI values to guide plyometric needs with ranges <2.5 low, 2.5–3.0 average, 3.0+ elite); footer reads testing methods guide targeted plyometric training → improved RFD → faster sprinting.

Test: Various methods to assess RFD

  • RSI (Reactive Strength Index): Calculated during drop jumps by dividing jump height by ground contact time, providing insight into tendon elasticity and force application speed
  • Hopping tests: Measuring contact time and flight time during repeated hops to estimate leg stiffness
  • Force plate measurements: Direct assessment of force-time curves to calculate RFD in milliseconds
    • OVR Jump – The OVR Jump is a laser jump device designed for athletes and coaches to accurately measure key performance metrics related to jumping and reactive strength.
  • Isometric tests: Measuring force production against fixed resistance to quantify force development rate
  • MyJump app: is a smartphone application that costs around $2 and allows you to measure Reactive Strength Index (RSI)⁠⁠. While RSI isn’t exactly the same as RFD, it’s a related metric that can help assess explosive power and stiffness.Here’s how the app works for testing:It records your jumps at 60 frames per second or higherYou perform either drop jumps or repeated pogo jumpsThe app calculates your RSI score by dividing jump height (or air time) by ground contact time⁠⁠The RSI scores can help determine what category your explosive abilities fall into:Below 2.5 RSI: Indicates lack of stiffness2.5-3.0 RSI: Average to good stiffnessAbove 3.0 RSI: Good to elite stiffness (elite sprinters often score 4.0+)⁠⁠This information can help determine what specific type of plyometric training you need to improve your RFD and sprinting performance. The app appears to be particularly useful for field testing when more sophisticated equipment isn’t available.For your specific selection about field tests, the MyJump app would provide a more quantitative measurement compared to the tuck jumps and cone hops mentioned, giving you precise RSI values that correlate with RFD capabilities.

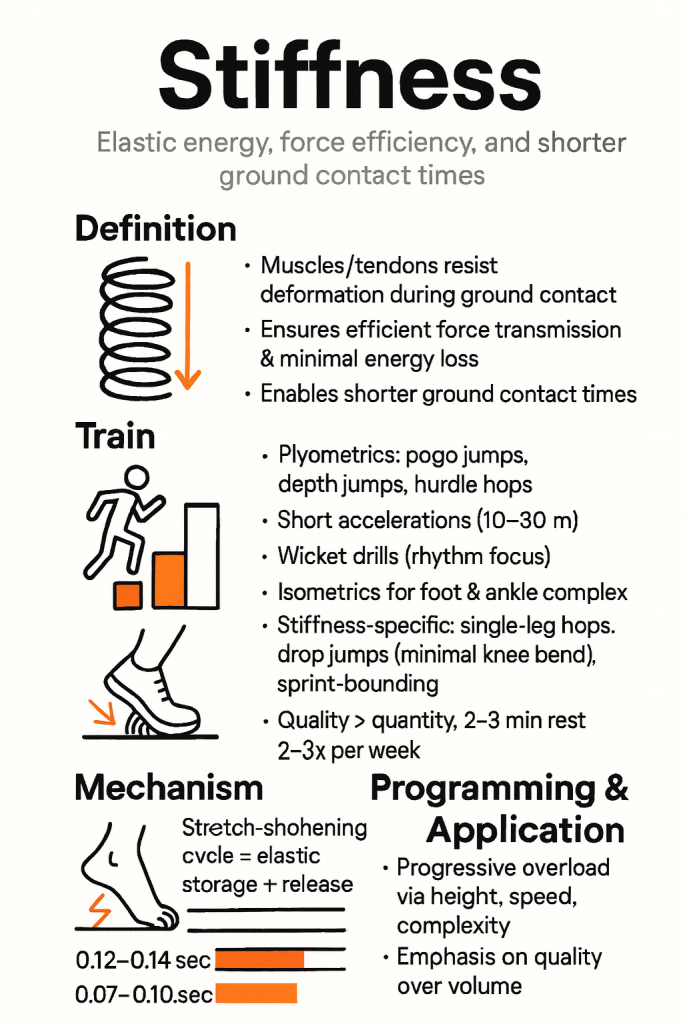
Infographic titled “Stiffness” about elastic energy and shorter ground contact times, with sections: Definition (spring icon and bullets describing muscles/tendons resisting deformation, efficient force transmission/minimal energy loss, and shorter ground contact times); Train (runner and step icons with bullets listing plyometrics like pogo, depth and hurdle jumps, short accelerations 10–30 m, wicket drills for rhythm, isometrics for foot and ankle, stiffness‑specific single‑leg hops, drop jumps with minimal knee bend, sprint‑bounding, and quality > quantity with 2–3 minute rests 2–3× per week); Mechanism (foot diagram showing the stretch‑shortening cycle = elastic storage + release with contact time ranges 0.12–0.14 s and 0.07–0.10 s); and Programming & Application (progressive overload via height, speed and complexity and emphasis on quality over volume).

Stiffness

Definition: Stiffness in sprinting refers to the ability of muscles, tendons, and connective tissues to resist deformation during ground contact. It ensures efficient force transmission, minimizes energy loss through excessive joint flexion, and enables shorter ground contact times. Higher leg and ankle stiffness allows sprinters to quickly rebound off the ground, storing and releasing elastic energy more effectively during the stretch-shortening cycle. Elite sprinters typically exhibit greater tendon stiffness, particularly in the Achilles tendon and foot-ankle complex, which contributes to their ability to maintain proper mechanics at high velocities.


Train: Plyometric exercises like pogo jumps, depth jumps, and hurdle hops that emphasize minimal ground contact time. Short sprint accelerations (10-30m), wicket drills with precise rhythm, and isometric exercises targeting the foot and ankle complex. Stiffness-specific exercises include single-leg hops, drop jumps with minimal knee bend, and sprint-bounding with emphasis on quick ground contacts.

Progressive overload by increasing height, speed, or complexity rather than volume. Aim for quality over quantity with full recovery between sets (2-3 minutes) to maintain optimal neuromuscular response. Ideally, program stiffness training 2-3 times per week with 48 hours between sessions for neural recovery.
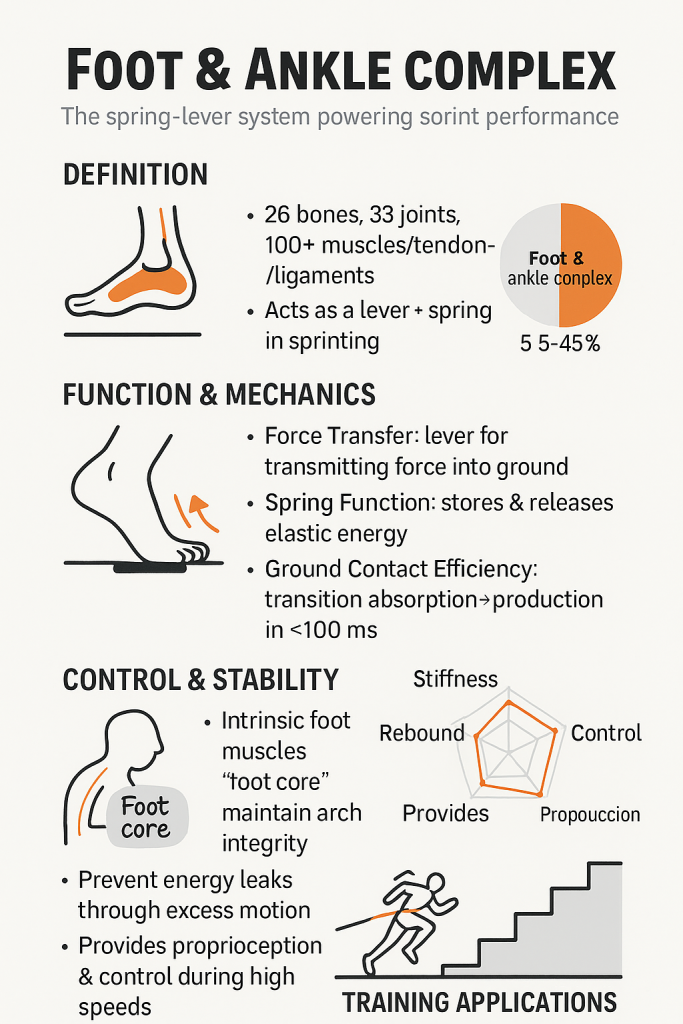
Infographic titled "Foot & Ankle Complex" with simple line illustrations, a pie chart and radar chart, and bullet points defining the foot (26 bones, 33 joints, 100+ muscles/tendons/ligaments; acts as a lever and spring), explaining function and mechanics (force transfer, spring storage/release, ground-contact transition <100 ms), and describing control and stability (intrinsic "foot core," preventing energy leaks, proprioception) plus a small running and stair-training graphic.

Foot & Ankle Complex

Definition: The foot and ankle complex refers to the intricate system comprising 26 bones, 33 joints, and over 100 muscles, tendons, and ligaments that function as a lever and spring during sprinting. This biomechanical unit is responsible for approximately 35-45% of total propulsive force generation in sprinting, making it a critical component of athletic performance. A stronger foot and ankle complex allows sprinters to efficiently transfer power from the legs into ground force, particularly through the calf muscles (gastrocnemius, soleus), smaller stabilizers, and intrinsic foot muscles that act like a “foot core” to maintain arch integrity during high-force ground contacts.:

The foot and ankle complex is a critical performance determinant for sprinters and explosive athletes because it serves as the primary interface between the athlete and the ground. Here’s why it’s so important for preventing energy leaks and improving performance:

  • Force Transfer and Energy Storage: The foot and ankle complex acts as a rigid lever during push-off phases, efficiently transferring force generated by larger muscle groups (quads, glutes, hamstrings) into the ground. Any weakness or excessive motion here creates energy leaks that reduce propulsive force.
  • Spring-Like Function: During sprinting, the foot and ankle works as a biological spring, storing elastic energy upon ground contact and then releasing it during push-off. A stiff, responsive foot-ankle complex enhances this elastic rebound effect.
  • Ground Contact Efficiency: Elite sprinters maintain minimal ground contact times (often under 100ms). The foot and ankle complex must rapidly transition from force absorption to force production within this tiny window.
  • Proprioception and Control: The numerous sensory receptors in the foot provide critical feedback about body position and ground reaction forces, allowing for split-second adjustments in mechanics during high-speed movements.
  • Contribution to Overall Power: The foot and ankle complex contributes approximately 35-45% of total propulsive force in sprinting, making it one of the most significant contributors to overall sprint performance.
  • “Foot Core” Stability: The intrinsic foot muscles act like a “foot core” that maintains arch integrity during high-force ground contacts, preventing energy dissipation through excessive foot motion.

Elite sprinters typically develop extraordinary foot and ankle strength, stiffness, and coordination through specialized training that targets this critical system. Training methods like hill sprints, banded starts, and push-up starts specifically develop this quality.
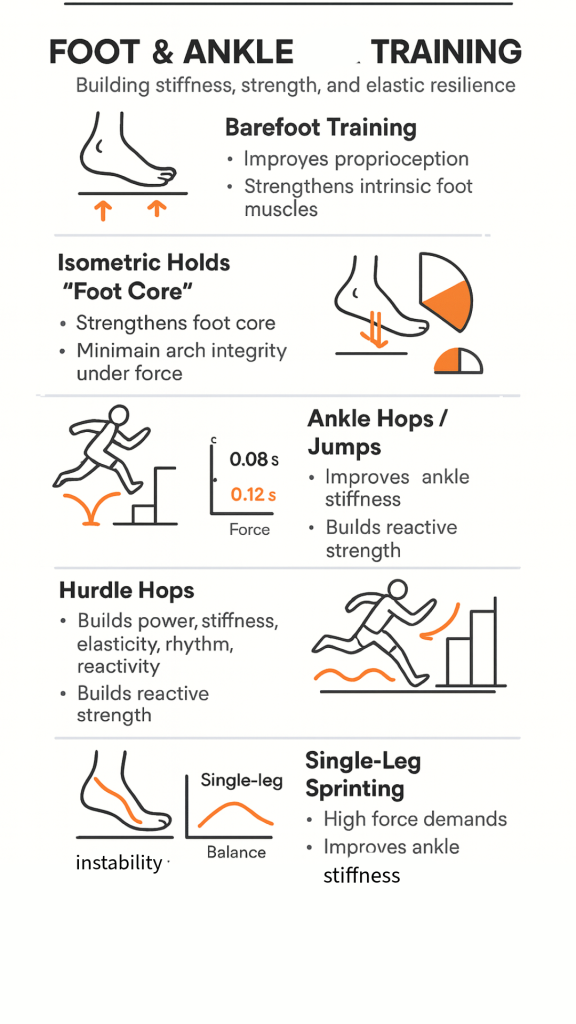
Infographic titled 'Foot & Ankle Training' with simple foot and runner icons outlining five exercises—Barefoot Training, Isometric 'Foot Core' holds, Ankle Hops/Jumps, Hurdle Hops, and Single‑Leg Sprinting—with brief bullets describing benefits like improved proprioception, foot‑core and intrinsic muscle strength, arch integrity, ankle stiffness, reactive strength and power.

Foot & Ankle Complex Training Methods

  • Barefoot Training: Perform warm-ups, drills and submaximal sprints barefoot to improve foot proprioception and strengthen intrinsic foot muscles
  • Isometric holds: that strengthen the “foot core” and maintain arch integrity during high-force ground contacts
  • Ankle Hops/Jumps: Improve ankle stiffness with minimal ground contact time
  • Depth Jumps: Foundational exercise for developing neuromuscular stiffness and reactive strength
  • Hurdle Hops: Develop power, stiffness, elasticity, rhythm, and reactivity simultaneously
  • Single-Leg Sprinting: High-level movement emphasizing stiffness over elasticity due to increased force demands
  • Instability Ankle Board and Pipe Balancing exercisess: Target intrinsic foot muscles that provide stability
  • Calf Raises (straight and bent knee): Strengthen plantarflexors that contribute approximately 35-45% of total propulsive force in sprinting


Tests:

  • Reactive Strength Index (RSI): Calculated during drop jumps by dividing jump height by ground contact time. Provides insight into tendon elasticity and force application speed. Elite sprinters often score 4.0+ on RSI scale.
  • MyJump App: A smartphone application that measures RSI during drop jumps or repeated pogo jumps. Scores below 2.5 indicate lack of stiffness, 2.5-3.0 shows average stiffness, and above 3.0 demonstrates good to elite stiffness.
  • Hopping Tests: Measures contact time and flight time during repeated hops to estimate leg stiffness, particularly in the ankle complex.
  • Force Plate Measurements: Direct assessment of force-time curves to calculate rate of force development in milliseconds, providing precise data on foot and ankle stiffness.
    • OVR Jump – The OVR Jump is a laser jump device designed for athletes and coaches to accurately measure key performance metrics related to jumping and reactive strength
  • Isometric Tests: Measures force production against fixed resistance to quantify foot and ankle strength and rate of force development.
  • Ankle Mobility Assessment: Simple tests like bodyweight squats can help assess ankle mobility, which impacts stiffness and elasticity during sprinting.

What is Elasticity in Athletic Performance?

Elasticity in sprinting refers to the ability of muscles, tendons, and connective tissues to efficiently store and release energy during the stretch-shortening cycle. This biomechanical property allows athletes to:
  • Quickly rebound off the ground with minimal energy loss
  • Create a bouncing effect that enhances speed and efficiency
  • Convert ground contact forces into forward propulsion while maintaining short ground contact times

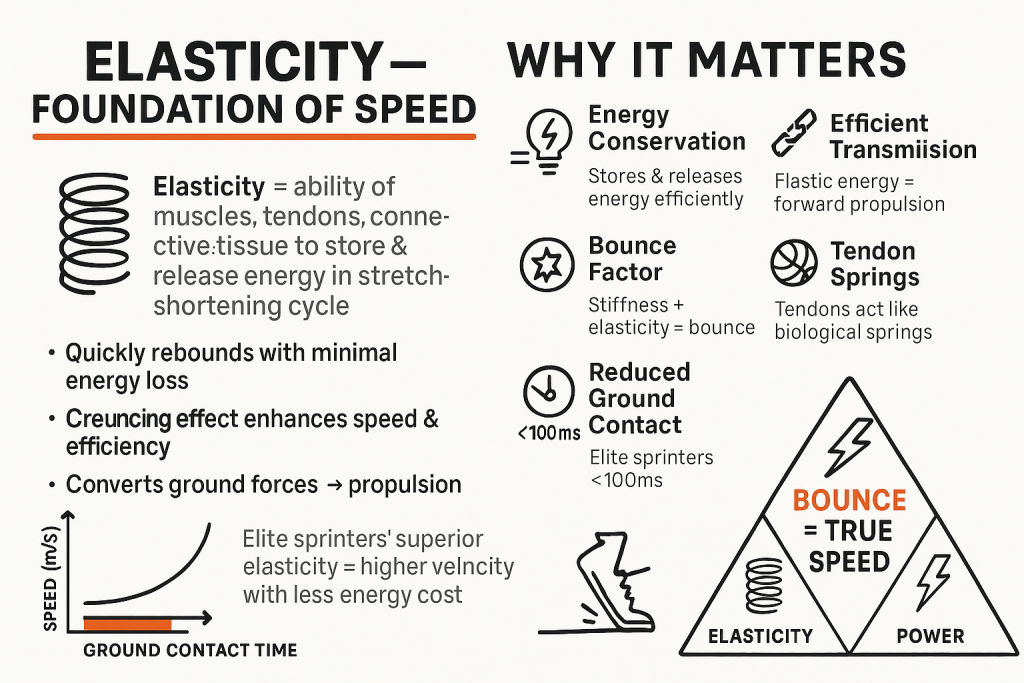
Infographic titled “ELASTICITY — FOUNDATION OF SPEED” defining elasticity as muscles, tendons and connective tissue storing and releasing energy in the stretch‑shortening cycle, with bullet points about quick rebound, a pre‑stretch effect enhancing speed and converting ground forces to propulsion, a graph showing speed rising as ground contact time shortens, a column of icons explaining why it matters (energy conservation, bounce factor, reduced ground contact <100ms, efficient transmission, tendon springs), and a triangle diagram labeling “BOUNCE = TRUE SPEED” supported by “ELASTICITY” and “POWER”.

Why Elasticity is Critical for Speed and Explosiveness

  • Energy Conservation: Elasticity helps runners conserve metabolic energy while moving faster and more powerfully
  • Efficient Force Transmission: It allows for the storage of elastic energy during ground contact, which is then rapidly released to propel the athlete forward
  • BOUNCE Factor: The combination of stiffness and elasticity creates what coaches call “bounce” – a critical element of true speed
  • Tendon Function: Tendons act as biological springs, providing “SNAP” for explosive athleticism – the stiffer and more resilient these tendons are, the more explosive the athlete can be
  • Reduced Ground Contact Time: Elite sprinters maintain minimal ground contact times (often under 100ms), which requires exceptional elasticity to transition rapidly between force absorption and production
  • Performance Foundation: Elasticity complements other athletic attributes like stiffness and power, serving as a foundation for achieving maximum velocity

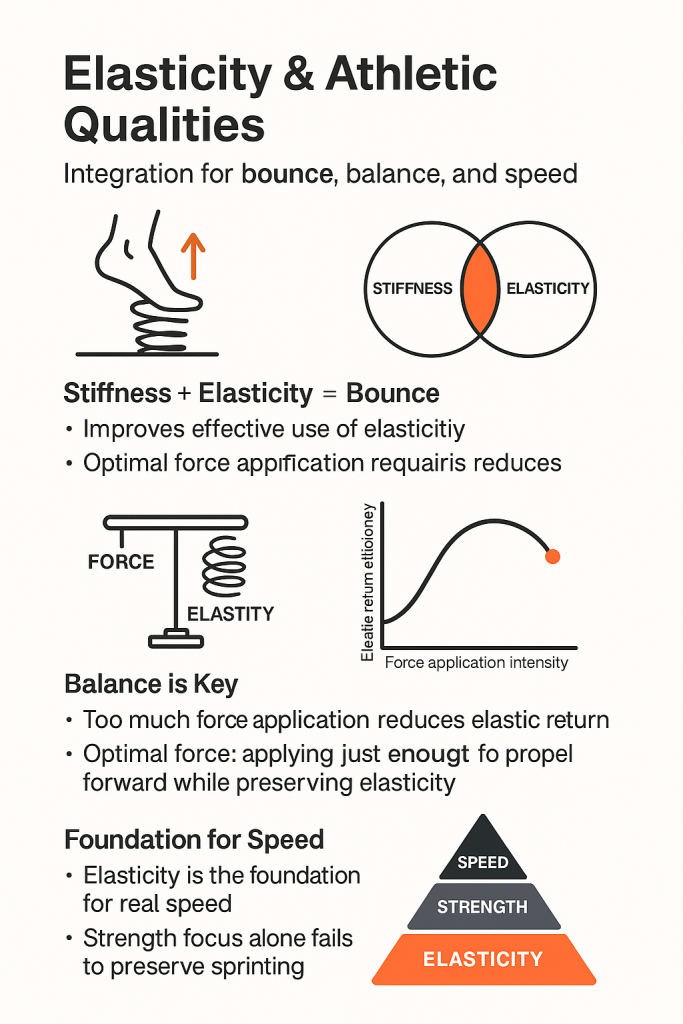
Infographic titled "Elasticity & Athletic Qualities" explaining that combining stiffness and elasticity produces bounce, illustrated with a foot on a spring, a Venn diagram highlighting the overlap of stiffness and elasticity, a force-versus-elasticity balance scale and return curve, bullet-point notes about optimal force and balance, and a pyramid showing elasticity as the foundation below strength and speed.

The Relationship Between Elasticity and Other Athletic Qualities

Elasticity doesn’t work in isolation – it functions as part of an integrated system:

  • Stiffness + Elasticity = Bounce: Stiffness is necessary to take advantage of elasticity; together they create the bounce quality that’s essential for elite speed
  • Balance is Key: Excessive force application can be detrimental to elastic return – optimal force application requires just enough force to propel forward while allowing for efficient elastic return
  • Foundation for Speed: While many sprinters focus on strength, elasticity is described as the “FOUNDATION of real speed”

Training Elastic Qualities

  1. Plyometrics

  2. Foot and Ankle Complex Training

  3.  Combined Training Approaches

  4. Implementation Guidelines

Research shows that these methods lead to significant improvements in elastic qualities, which directly transfer to faster sprinting through improved energy storage and release during the stretch-shortening cycle.
1. Plyometric Exercises

  • Depth Jumps: Drop from a box and immediately jump upon landing. This maximizes reactive strength and improves the stretch-shortening cycle.
  • Box Jumps: Effective for developing explosive power and enhancing the ability to store and release elastic energy.
  • Bounding: Mimics sprinting’s horizontal force application while enhancing elastic recoil and stride efficiency.
  • Hurdle Hops: Develop power, stiffness, elasticity, rhythm, and reactivity simultaneously.
  • Pogo/Spring Drills: Quick, repetitive vertical jumps with minimal ground contact time to increase stiffness and reactivity in the lower body.

2. Foot and Ankle Complex Training

  • Ankle Hops/Jumps: Improve ankle stiffness with minimal ground contact time.
  • Barefoot Training: Perform warm-ups, drills and submaximal sprints barefoot to improve foot proprioception and strengthen intrinsic foot muscles.
  • Straight Leg Shuffle: Focuses on maintaining straight legs while moving to improve ankle and foot stiffness.
  • Calf Raises: Strengthen plantarflexors that contribute approximately 35-45% of total propulsive force in sprinting.

3. Combined Training Approaches

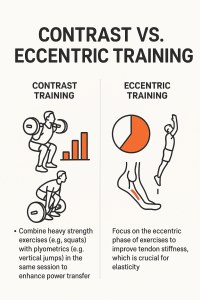
  • Contrast Training: Combine heavy strength exercises (e.g., squats) with plyometrics (e.g., vertical jumps) in the same session to enhance power transfer.
  • Eccentric Training: Focus on the eccentric phase of exercises to improve tendon stiffness, which is crucial for elasticity.

Infographic titled CONTRAST VS. ECCENTRIC TRAINING with two columns: left shows barbell squats and deadlifts, a rising bar chart and note about combining heavy strength exercises with plyometrics to enhance power transfer; right shows a pie chart, a highlighted Achilles tendon illustration and a jumping figure with note about focusing on the eccentric phase to improve tendon stiffness and elasticity.

4. Implementation Guidelines

  • Training Volume: The best results are seen in programs lasting less than 10 weeks, with a minimum of 15 sessions, high intensity, and over 80 jumps per session.
  • Exercise Variety: Incorporating various plyometric exercises is more effective than sticking to a single type.
  • Quality Over Quantity: Prioritize quality over quantity with full recovery between sets (2-3 minutes) to maintain optimal neuromuscular response.
  • Progressive Overload: Increase height, speed, or complexity rather than volume.
  • Recovery: Program elasticity training 2-3 times per week with 48 hours between sessions for neural recovery.

Research shows that these methods lead to significant improvements in elastic qualities, which directly transfer to faster sprinting through improved energy storage and release during the stretch-shortening cycle.

Test: Measuring Elasticity for Sprint Performance

Testing elasticity is essential for tracking an athlete’s development and designing effective sprint training programs. Here are proven methods to assess elasticity qualities for sprinting:

Laboratory Assessment Methods

  • Force Plate Measurements: Direct assessment of force-time curves to calculate rate of force development, providing precise data on elastic qualities.
    • OVR Jump – The OVR Jump is a laser jump device designed for athletes and coaches to accurately measure key performance metrics related to jumping and reactive strength

Field Assessment Methods

  • Reactive Strength Index (RSI): Calculated during drop jumps by dividing jump height by ground contact time. Provides insight into tendon elasticity and force application speed.
    • Elite sprinters often score 4.0+ on the RSI scale
    • Scores below 2.5 indicate lack of stiffness
    • Scores of 2.5-3.0 show average stiffness
    • Scores above 3.0 demonstrate good to elite stiffness
  • MyJump App: Smartphone application that measures RSI during drop jumps or repeated pogo jumps, providing an accessible tool for regular assessment.
  • Hopping Tests: Measures contact time and flight time during repeated hops to estimate leg stiffness and elastic qualities, particularly in the ankle complex.
    • Single-leg hops assess asymmetries in elastic function
    • Repeated pogo jumps evaluate ankle stiffness specifically
  • Foot-Ankle Rebound Jumps (FARJ): Athletes perform eight straight-legged jumps focusing only on ankle plantarflexion to evaluate foot-ankle reactive strength and stretch-shortening cycle capabilities.

Tracking Progress

For optimal results, implement regular testing (every 4-6 weeks) to track improvements in elastic qualities as training progresses. Document both performance metrics and subjective feedback on “bounce” quality to create a comprehensive elasticity profile that evolves with training.
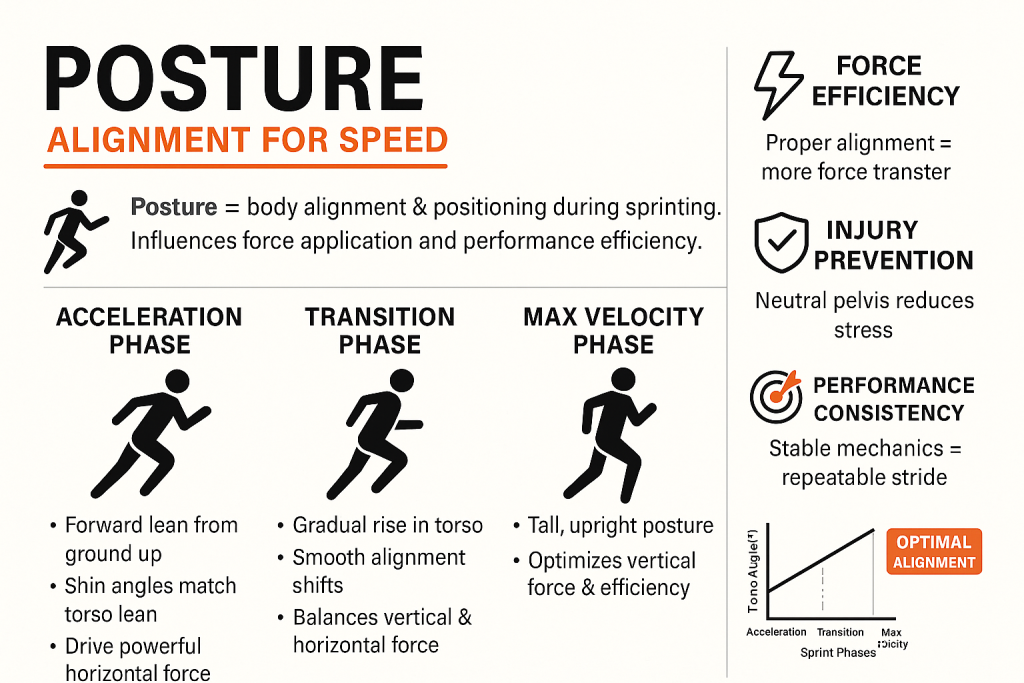
Infographic titled “Posture: Alignment for Speed” that defines posture for sprinting and shows three illustrated sprint phases—Acceleration (forward lean, shin angles match torso, drive horizontal force), Transition (gradual rise in torso, smooth alignment shifts, balance vertical and horizontal force) and Max Velocity (tall, upright posture optimizing vertical force)—with a right column of icons and text highlighting benefits (force efficiency, injury prevention, performance consistency) and a small graph indicating optimal alignment across the sprint phases.

Posture

Definition:

In sprinting, posture refers to the body’s alignment and position during different phases of the sprint. It has significant impacts on force application and overall performance. Here’s how posture functions in different sprinting phases…
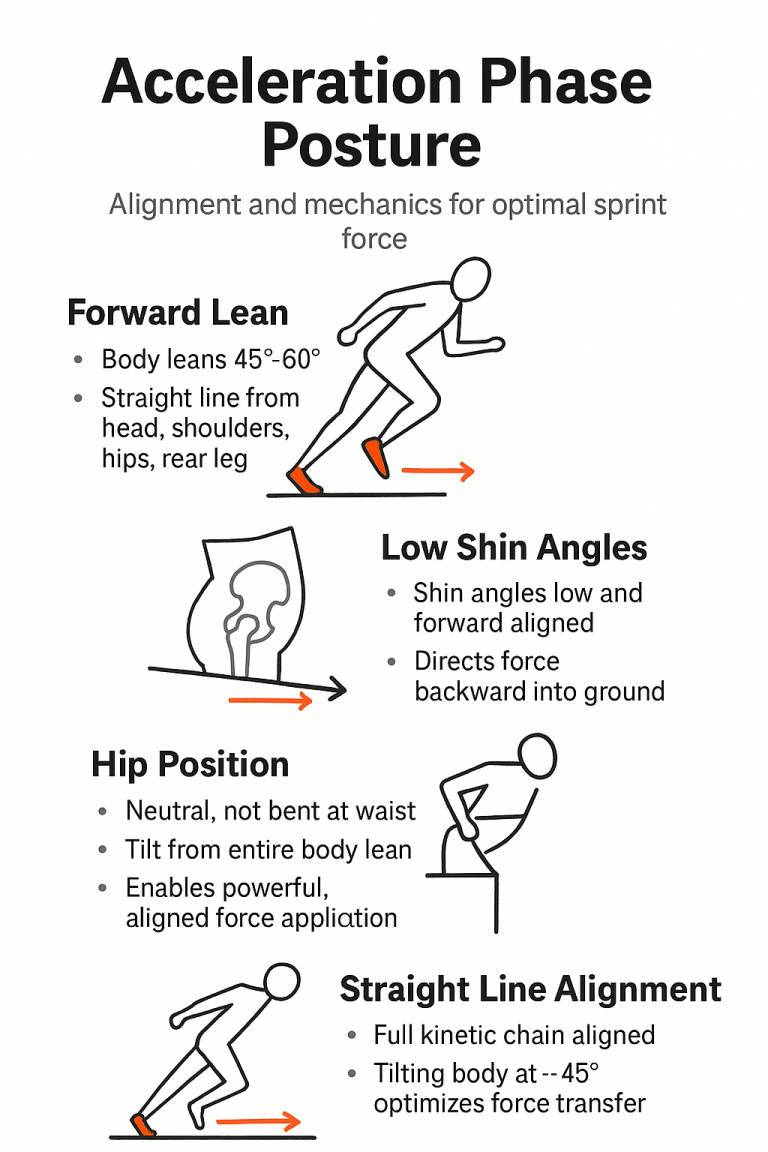
Infographic titled “Acceleration Phase Posture” showing black-and-orange stick-figure diagrams and bullet points explaining forward lean (body 45–60°), low shin angles, neutral hip position, and straight-line alignment for optimal sprint force with directional arrows illustrating force and posture,

Acceleration Phase Posture

During acceleration, proper posture involves:

  • Forward Lean: The body maintains a 45°-60° forward lean with a straight line from head through shoulders, hips, and rear leg. This alignment optimizes pushing force against the ground.
  • Low Shin Angles: Keeping shin angles low and horizontally oriented allows more force to be directed backward, enhancing acceleration.
  • Hip Position: Hips remain neutral (not bent at waist) but tilted forward due to the whole-body lean. This position enables powerful force application.
  • Straight Line Alignment: A proper alignment from shoulder through hip/knee/ankle with the body tilted at approximately 45° allows optimal force transfer.

Infographic titled 'Maximum Velocity Posture' showing a running silhouette with an upright-but-slight-forward lean and spine line, a graph of decreasing lean from acceleration to max velocity, and columns listing upright trunk (torso vertical, hips forward), neutral pelvis (prevents anterior tilt, efficient force transfer), minimal lean, and benefits: force efficiency, injury reduction, and top-end speed.

Maximum Velocity Phase Posture

  • Upright Trunk: The torso becomes fully vertical with hips tall and forward. This allows for the up-and-down piston action needed for high-speed running.
  • Neutral Pelvis: Hips maintain a neutral position without excessive anterior pelvic tilt, as excessive tipping can cause force loss and put the lower limbs in positions vulnerable to overstretch and injury.
  • Minimal Lean: Unlike acceleration, max velocity requires minimal forward lean with hips fully forward.

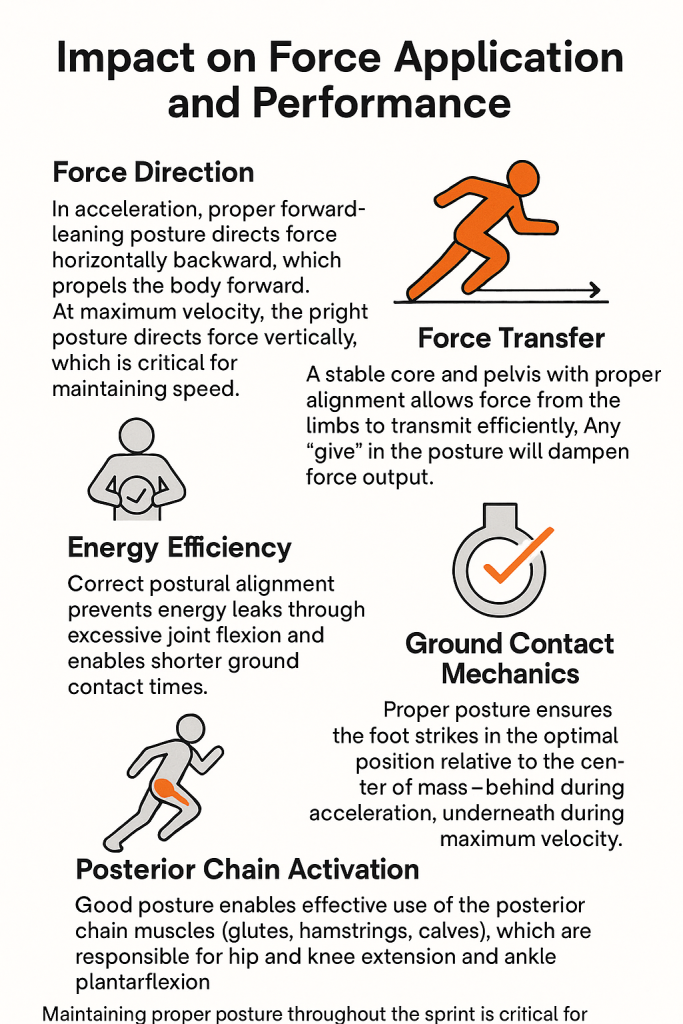
Infographic titled 'Impact on Force Application and Performance' with labeled sections—Force Direction (forward‑leaning runner icon and text about leaning to direct force), Force Transfer (note on core and pelvis stability and an orange runner), Energy Efficiency (core icon), Ground Contact Mechanics (checkmarked stopwatch), and Posterior Chain Activation (running figure with highlighted glute)—all emphasizing proper sprinting posture.

Impact on Force Application and Performance

Posture directly affects force application in several ways:

  • Force Direction: In acceleration, proper forward-leaning posture directs force horizontally backward, which propels the body forward. At maximum velocity, the upright posture directs force vertically, which is critical for maintaining speed.
  • Force Transfer: A stable core and pelvis with proper alignment allows force from the limbs to transmit efficiently. Any “give” in the posture will dampen force output.
  • Energy Efficiency: Correct postural alignment prevents energy leaks through excessive joint flexion and enables shorter ground contact times.
  • Ground Contact Mechanics: Proper posture ensures the foot strikes in the optimal position relative to the center of mass—behind during acceleration, underneath during maximum velocity.
  • Posterior Chain Activation: Good posture enables effective use of the posterior chain muscles (glutes, hamstrings, calves), which are responsible for powerful hip and knee extension and ankle plantarflexion.


Maintaining proper posture throughout the sprint is critical for maximizing sprint performance. Elite sprinters demonstrate exceptional postural control that enables them to apply force efficiently at both acceleration and maximum velocity phases.
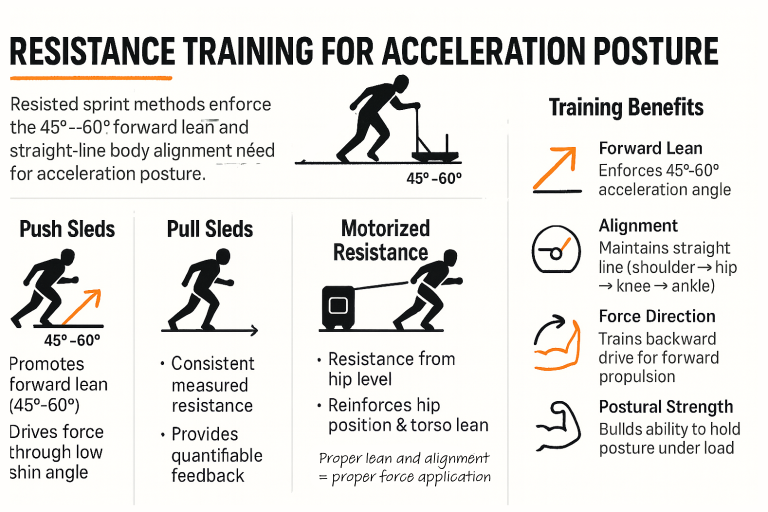
Infographic titled “Resistance Training for Acceleration Posture” showing a silhouetted athlete leaning 45°–60° with push, pull and motorized sled illustrations, three panels describing each method, and a right column listing training benefits: forward lean, alignment, force direction, and postural strength.

Resistance Training for Acceleration Posture

  • Push Sleds: Force the athlete to maintain a proper forward lean and straight-line body alignment. The resistance requires the athlete to drive through a low shin angle while maintaining the critical 45°-60° forward lean needed during acceleration.
  • Pull Sleds: Create horizontal resistance that teaches athletes to maintain the proper forward lean without breaking at the waist. This helps reinforce the straight line from head through shoulders, hips, and rear leg essential for optimal force application.
  • Motorized Resistance (1080 Sprint): Provides consistent, measured resistance that can be precisely controlled, allowing athletes to feel the proper posture while receiving quantifiable feedback on horizontal force production.
  • Bullet Belt: Creates resistance while allowing natural arm action, teaching athletes to maintain a strong torso and proper forward lean without breaking form. The point of resistance being at the hips helps reinforce proper hip position during the critical acceleration phase.


These tools are effective because they:
  • Enforce the proper 45°-60° forward lean needed for acceleration
  • Reinforce the straight-line alignment from shoulder through hip/knee/ankle
  • Train the body to direct force backward to propel forward
  • Develop the strength to maintain proper posture under load

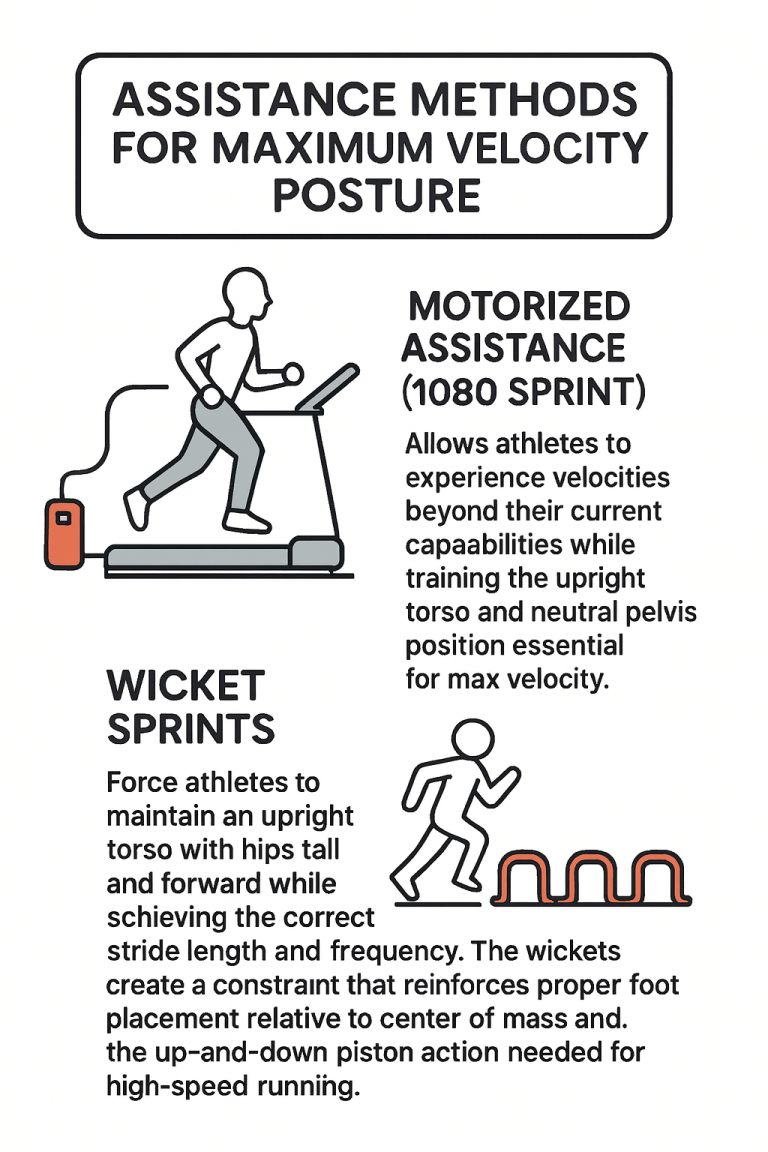
Infographic titled 'Assistance Methods for Maximum Velocity Posture' depicting a figure running on a motorized treadmill with an external red motor labeled 'Motorized Assistance (1080 Sprint)' and a second illustration of a figure running over small orange wickets labeled 'Wicket Sprints,' with accompanying text explaining each method trains an upright torso, neutral pelvis, stride length/frequency, and proper foot placement for high-speed running.

Assistance Methods for Maximum Velocity Posture

  • Motorized Assistance (1080 Sprint): Allows athletes to experience velocities beyond their current capabilities while training the upright torso and neutral pelvis position essential for max velocity. The assistance helps athletes feel what it’s like to run at higher speeds while focusing on maintaining proper form.
  • Wicket Sprints: These force athletes to maintain an upright torso with hips tall and forward while achieving the correct stride length and frequency. The wickets create a constraint that reinforces proper foot placement relative to center of mass and the up-and-down piston action needed for high-speed running.

These methods are valuable because they:

  • Train the upright trunk position needed at max velocity
  • Reinforce neutral pelvis position without excessive anterior tilt
  • Develop the rhythmic, cyclical pattern required for efficient high-speed running
  • Allow athletes to focus on technique while experiencing higher velocities


Both resistance and assistance methods create specific constraints that make proper posture not just a cue but a necessity for successful execution of the drill, helping athletes internalize the correct positions needed for optimal sprint performance.

Maximum Velocity Testing: video analysis

Using video analysis is an excellent way to improve sprint posture. Here’s how to implement it effectively:

Setting Up Video Analysis

  • Use high-speed cameras (240fps) to capture detailed movement patterns
  • Film from the side view to assess body alignment, foot strike, and posture angles
  • Consider using software tools that can perform frame-by-frame analysis

Key Posture Elements to Analyze

Acceleration Phase:

  • Forward lean angle (should be 45°-60° from vertical)
  • Shin angles (should be low and horizontally oriented)
  • Hip position (should maintain a straight line from shoulder through hip/knee/ankle)
  • Little to no bending at the waist – don’t break the power line

Maximum Velocity Phase:

  • Upright but slightly forward trunk position (chest should be just over the proximal thigh at thigh block of the swing leg)

Analysis Process

  • Use frame-by-frame review to critique contact points and posture
  • Measure horizontal distance from foot to center of mass at touchdown
  • Examine foot inclination angle and ground contact time

Improvement Strategies

  • Create visual feedback by overlaying ideal posture angles on the athlete’s video
  • Monitor changes in key metrics like toe-off distance, thigh amplitude, and touchdown distance
  • Implement specific drills based on identified postural weaknesses
  • Follow up with regular re-assessment to track improvements

Research shows that improving posture can lead to enhanced sprint performance and reduced injury risk. A study by Mendiguchia et al. demonstrated that a multi-factorial approach including technical sprint training led to improvements in toe-off distance, contact time, anterior pelvic tilt, and touchdown distance—all key determinants of sprint success.
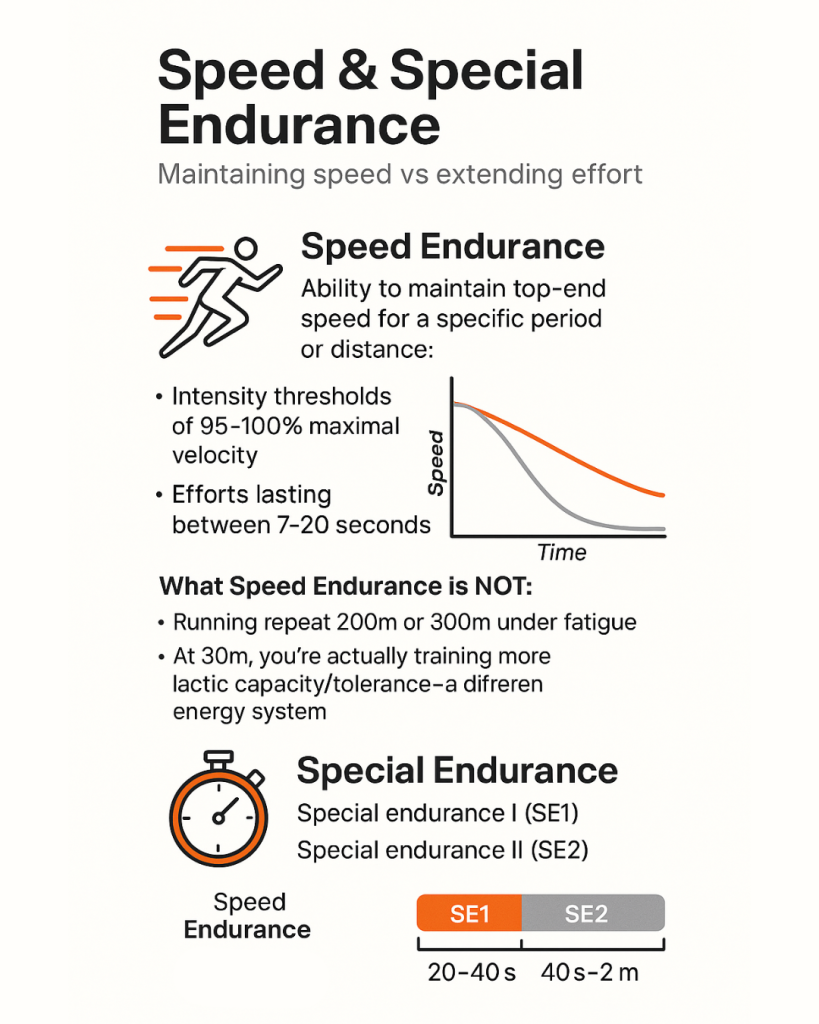
Speed & Special Endurance

Infographic titled “Speed & Special Endurance” explaining speed endurance as the ability to maintain top-end speed for short efforts (95–100% maximal velocity) lasting about 7–20 seconds, with a small graph showing an orange curve that decays slower than a gray curve; notes what speed endurance is not (200–300m repeats or lactic-focused work at 30m), and describes special endurance divided into SE1 (20–40 s) and SE2 (40 s–2 min) with runner and stopwatch icons and a colored SE1/SE2 timeline.

Speed Endurance

Definition: Speed endurance refers to an athlete’s ability to maintain top-end speed for a specific period or distance. It specifically involves:

  • Intensity thresholds of 95-100% of maximal speed
  • Efforts lasting between 7-20 seconds
  • The ability to minimize deceleration towards the end of a run

What Speed Endurance is NOT:

Speed endurance is not running repeat 200m or 300m under fatigue where athletes are running well below 90% maximum velocity.

If you’re not running at high speeds… you’re not enduring speed.

At 300m, you’re actually training more lactic capacity/tolerance – a different energy system altogether.

Special Endurance

Definition: Special endurance is further divided into:

  • Special Endurance I (SE1): Efforts lasting 20-40 seconds
  • Special Endurance II (SE2): Efforts lasting 40 seconds to 2 minutes

Scientific & Metabolic Differences of Speed Endurance & Special Endurance

From an energy system perspective:

  • Speed Endurance: Primarily uses the alactic and beginning of the glycolytic energy systems. It targets anaerobic power and initial lactic acid capacities
  • Special Endurance: Heavily relies on the anaerobic glycolytic system with increasing aerobic contribution. It involves working with higher lactic acid accumulation and teaches the body to perform while managing significant acidosis


The three energy systems (alactic, lactic, aerobic) don’t operate in isolation but influence each other in all sporting activities. However, the dominant system changes based on the effort duration.

Infographic titled “Speed Endurance vs. Special Endurance” that compares scientific/metabolic differences and practical training notes — Speed Endurance uses alactic and early glycolytic systems to target anaerobic power for 80–150 m efforts with full 5–10 minute recovery and emphasis on technique, while Special Endurance relies more on the anaerobic glycolytic system with increasing aerobic contribution for longer sprints, developing lactic acid tolerance and tolerating shorter 1–3 minute incomplete recovery; includes icons (runner, stopwatch, flame), a pie chart, energy curve and recovery-time bar chart.

Practical Differences

Speed Endurance Training:

  • Distances: Typically 80-150m
  • Recovery: Full recovery is mandatory – 5-6 minutes between reps, 6-10 minutes between sets
  • Focus: Maintaining proper technique throughout the entire run
  • Quality over quantity: Sessions should end before technique deteriorates


Special Endurance Training:

  • Can involve longer sprints (~40-60 seconds) OR incomplete recovery (broken sprints)
  • Helps develop the ability to handle and utilize lactate
  • Becomes less important as athletes get faster because they’ll finish races more quickly
Infographic titled 'How to Train Speed Endurance Properly' listing training methods (quality runs, split runs, 'ins-and-outs', race modeling), key training principles (develop maximal speed first, prioritize quality mechanics, end sessions before technique deteriorates) and common mistakes, accompanied by simple icons of a runner with a stopwatch, a lightbulb and person, a wavy performance graph labeled 'Stop Here', and an orange warning triangle.

How to Train Speed Endurance Properly

Training Methods:

  • Quality Runs: 80-150m at 90-100% intensity with full recovery (minimum of 5-6 minutes between reps)
  • Split Runs: These involve running at different intensities within a single repetition to train speed maintenance
  • “Ins-and-Outs”: Alternating between maximum effort in short bursts and controlled, freewheeling effort to prevent “pace lock” and develop mechanical efficiency
  • Race Modeling: Simulating race conditions to develop specific race strategies

Key Training Principles:

  • Develop maximal speed first – you need high speed abilities before you can work on enduring them
  • Quality and sound mechanics must dictate loading and density
  • Sessions should end before technique deteriorates
  • Don’t chase fatigue – if you can’t maintain near-maximal velocity for the full distance, you’re no longer training speed endurance

Common Mistakes to Avoid:

  • Over-emphasizing global endurance work for speed athletes
  • Allowing deterioration of mechanics and movement patterns
  • Using incomplete or short rest periods
  • Training speed endurance before developing fundamental speed qualities
  • Running volume at slow speeds will not improve top speed

Remember that in sprint training, you must prioritize maximal velocity development first, as speed endurance is about maintaining that velocity. As the saying goes: “What are you trying to endure if you don’t have speed?”

  • Train: split runs, ins-and-outs, race modeling
  • Test: 60–120 m decay profile, mechanics under fatigue
  • Progression: density, distance, velocity segment emphasis

Share the Post:

Related Posts

the sprint club thesprint.club logo

theSprint.Club

Join theSprint.Club

The Science, Art, & Love of Speed in your inbox.
Man standing against a pale gray background wearing a navy T-shirt printed with a large white silhouette of a running figure, hands in his pockets, head tilted and forearm tattoos visible.
thesprintclub logo

theSprint.Club

Join the squad.
Explore the gear.
Get faster.
white thesprint.club sprinter tee tshirt